Why drip works in pots
Drip delivers the water at a specific point, next to the root, at a low flow and for a short time. That detail solves the three usual problems with watering pots: less water is wasted, it’s wet exactly where it needs to be, and you can dose it plant by plant. In a well-made installation each pot receives its own flow and nobody waters too much.
The trade-off is that drip depends on water quality and cleanliness: if the water carries limescale or sediment, the emitters block. That’s why the work is in the filter and the pressure, not in the emitters.
The parts, in the order the water passes through them
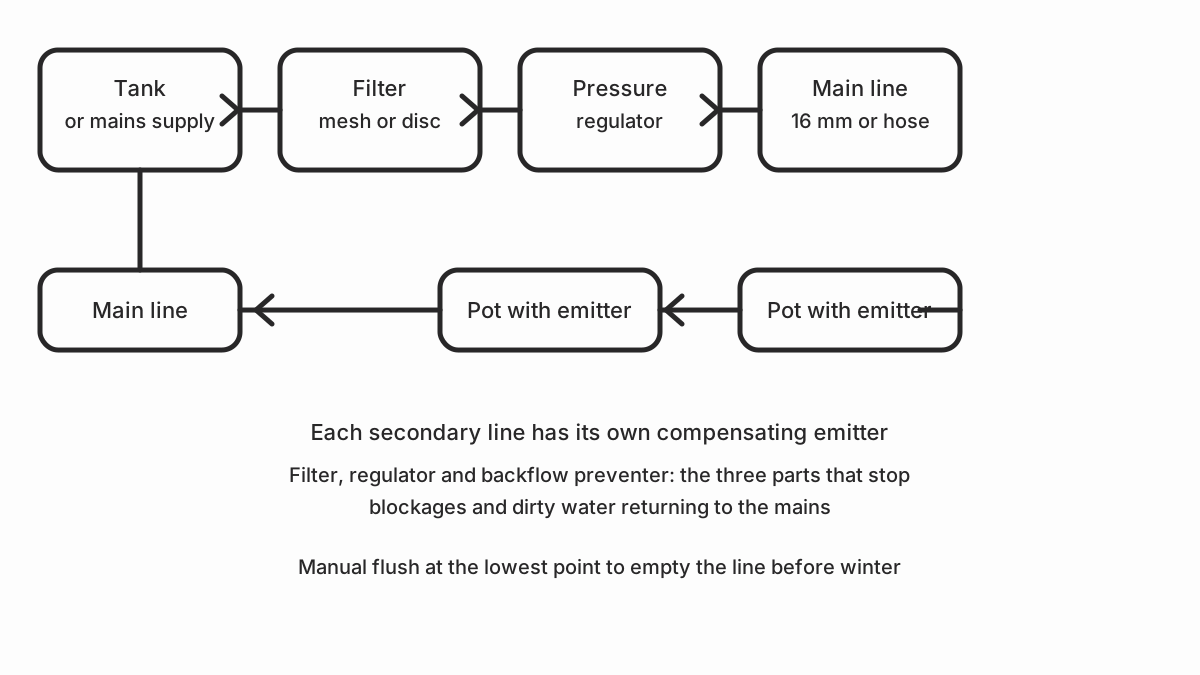
- Source. Raised tank, drum or mains supply. If you use a drum, the height difference is what moves the water: that’s why the tank has to be raised.
- Filter. Mesh or disc, with a mesh size suited to the flow you’re going to move. A fine mesh filter clogs earlier and in the long run becomes a problem.
- Pressure regulator. Needed if the water arrives at high pressure. Compensating emitters tolerate a small pressure variation; with excessive pressure, the flow difference between the nearest and the farthest zone is noticeable.
- Main line. 16 mm tube or thick hose. It runs where all the zones pass.
- Secondary lines. 4 mm tube or microtube, one per pot or per row.
- Emitters. Use compensating emitters of 2 L/h, 4 L/h or 8 L/h. You choose the flow based on the plant and the pot, not the other way round.
- Drain point. At the lowest point of each line, to empty it in winter.
How to calculate the flow you need
Add up the flow of the emitters on the line and compare it with the flow your source can deliver at the moment you irrigate. If the number of 2 L/h emitters exceeds what the supply gives you, the last pots on the line receive less water and you’ll think the emitter is faulty when the problem is pressure.
The practical rule is simple: measure the flow of one emitter with a glass and a stopwatch, in the farthest zone of the circuit. That’s the number that matters. If you need more flow than you have, the solution isn’t to raise the pressure: it’s to split into more zones or reduce the number of emitters per line.
Step-by-step installation
- Lay everything out dry. Run the lines along the ground, check they reach each pot and mark the cuts. Assembling dry avoids leaks and badly made joints.
- Prepare the connection points. Drill the side of the pot or run a ring of microtube around the base. If you use a ring, check that the microtube sits in the root zone, not pressed against the stem.
- Fit the filter and the regulator between the source and the first solenoid valve.
- Connect the secondary lines and place an emitter at the end of each one.
- Flush. Open the water fully with the ends of the lines disconnected until it comes out clean. This stops blockages happening on day one.
- Test with the controller in manual mode, for one minute, and check that every pot receives water.
- Adjust the real flow by moving the emitter to an intermediate position, if it’s adjustable, or by changing the emitter.
Emitters: compensating, integrated or button
- Compensating. They deliver the same flow within a pressure range. These are the ones to use in pots, where the height difference between the first and the last row is large enough for a non-compensating emitter to deliver noticeably less water at the end.
- Integrated. They come with their own barb and fit onto the microtube. Convenient, but check that they’re compensating.
- Button. They come apart for cleaning. Useful when the water is poor; in that case, before cleaning emitters, you have to solve the hard water problem.
The four blockages and where each one comes from
The FAO publishes an irrigation water quality guide that classifies the causes of clogging in localised systems; it’s the useful reference for diagnosis:
- Suspended particles. They come from the well or from a tank with no lid. They’re avoided with a filter and by keeping the tank closed.
- Calcium, magnesium and bicarbonate crusts. Hard water deposits salts as it passes through the emitter. It’s the typical problem in Spain and it isn’t fixed by cleaning: you have to treat the water or change the emitter.
- Organic matter and algae. They grow in lines left in the sun and empty. Lines with a compensating emitter and properly flushed avoid them.
- Chemicals. If you use fertilisers, don’t inject them into the same line without a filter that retains them.
The mistakes that ruin a drip installation
- No filter, or a filter unsuited to the flow.
- Lines left empty in the sun in summer: they degrade and crack.
- Microtubes bent at a sharp angle: they break on the inside and the dripping stops being uniform.
- Not flushing in winter: frozen water bursts the line.
- Watering a little every day: it doesn’t pay off with drip; better correct doses every few days.
- Screwing the emitter tighter by hand to make it flow more: it destroys the compensating element and it stops compensating.
Maintenance
Every season, before the heat starts: clean the filter, check one emitter on each line and check that the flow is close to what you measured at installation. If the flow has dropped, don’t wait until it’s completely blocked. In autumn, flush the lines if you won’t be irrigating over winter.
If the schedule tires you out, an automatic irrigation controller handles the timings, and balcony vegetable garden irrigation has the full setup for a small space.
Sources and next step
The technical reference for system design and the pressure and flow criteria is Rain Bird’s installation guide, which applies to any localised irrigation system. For the criterion of how much water the plant needs, see the water demand guide.
External sources
- Rain Bird: sprinkler system installation guide (PDF) — pressure, flow and components of an irrigation installation.
- FAO: Water quality for agriculture, Paper 29 — water quality, emitter clogging and crusts in drip systems.
- MSU Extension: soil sensors for smart irrigation — how to measure the substrate to adjust irrigation.