An LDR photoresistor lets you detect changes in light with a very simple circuit. In this tutorial we connect it to an ESP32 using a voltage divider and read the midpoint with an analog input.
What you’ll build
The LDR doesn’t directly output an on or off digital value. Its resistance changes with the light it receives. Combined with a fixed 10 kΩ resistor it forms a voltage divider that the ESP32’s ADC can measure.
The setup works as the basis for a night light, an automatic blind or a sensor that warns you when a plant gets too little light. If you haven’t used this board yet, you can read about what an ESP32 is and how to get started.
Materials needed
- An ESP32.
- An LDR photoresistor.
- A 10 kΩ resistor.
- A breadboard and Dupont wires.
- A USB cable to program the board.
Wiring diagram
Connect the LDR between 3.3 V and the reading point. From that point, connect the 10 kΩ resistor to GND. The middle node goes to GPIO34, which on many ESP32 boards is an input suitable for reading the ADC.
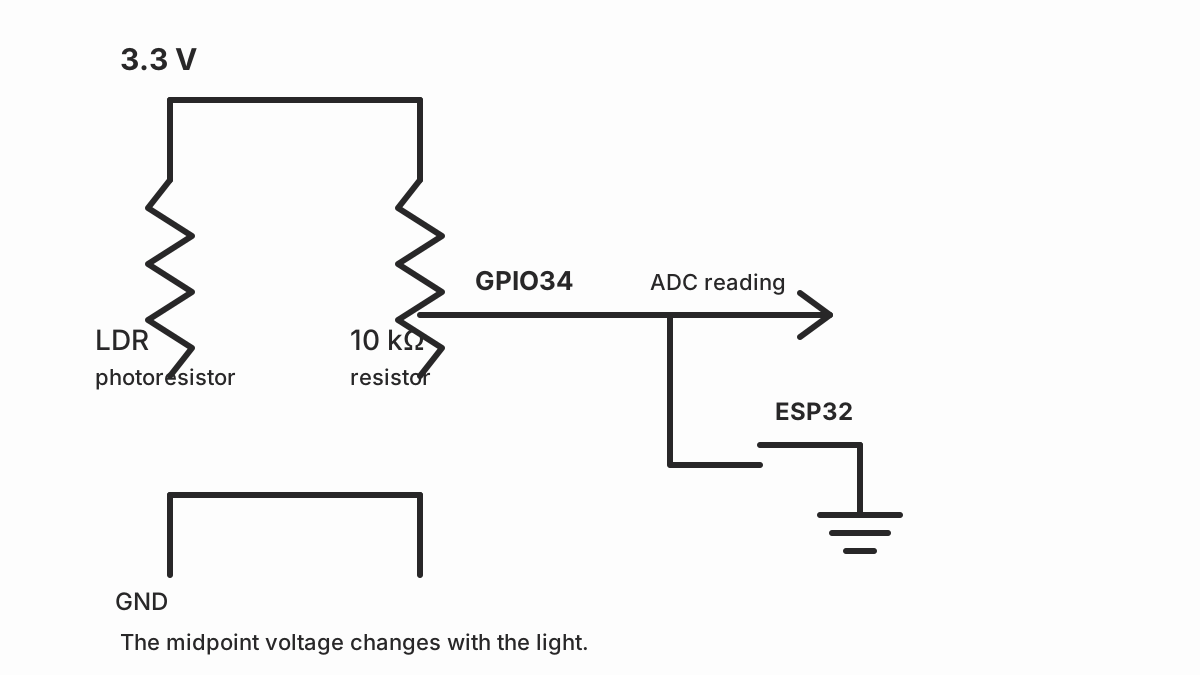
Don’t apply more than 3.3 V to an ESP32 input. The circuit must be powered from the board’s 3.3 V pin, not from 5 V.
Test code
const int LDR_PIN = 34;

void setup() {
  Serial.begin(115200);
}

void loop() {
  int lectura = analogRead(LDR_PIN);
  Serial.println(lectura);
  delay(500);
}
Open the serial monitor at 115200 baud and watch how the reading changes as you light up or darken the LDR. The exact value depends on the particular resistor, the ambient light and the ADC settings, so don’t treat it as a calibrated measurement in lux.
Turning the reading into a decision
To switch a light on when the room is dark, you can use an initial threshold:
const int UMBRAL_OSCURIDAD = 1200;

void loop() {
  int lectura = analogRead(LDR_PIN);
  bool estaOscuro = lectura < UMBRAL_OSCURIDAD;

  Serial.println(estaOscuro ? "Oscuro" : "Hay luz");
  delay(500);
}
The threshold must be tuned by looking at the real readings in your room. To stop the state from flipping constantly near the limit, add hysteresis: use one threshold to switch on and a slightly different one to switch off.
Calibrating the setup
The ADC reading doesn’t represent lux directly. To get useful behaviour, log several values under the conditions that matter to you:
- Note the value with the room lit.
- Cover the LDR and log the value in the dark.
- Repeat both measurements several times and note a range, not just one sample.
Then choose the thresholds between those ranges. If there’s a lot of fluctuation, average several readings before comparing them, or fit a small capacitor depending on the circuit and the response you need. The goal is for a cloud or a momentary shadow not to change the state of the automation.
Integrating it with ESPHome
Once the circuit works, ESPHome lets you publish the reading without keeping your own sketch:
sensor:
  - platform: adc
    pin: GPIO34
    name: "Ambient light"
    update_interval: 5s
    attenuation: auto
The pin name and the attenuation depend on the board and the ESPHome version. Start by publishing the raw value and calibrate the conversion to a scale that makes sense for your room afterwards. To avoid unstable automations, add an average filter and a condition with hysteresis in Home Assistant instead of triggering an action on every sample.
Frequent errors
- Powering the divider from 5 V and feeding that voltage to the ESP32.
- Choosing a GPIO that has a special function on that particular board.
- Expecting a lux measurement without calibrating the LDR and the resistor.
- Not filtering the variations, which causes rapid switching near the threshold.
If the board also fails to connect to the network during testing, check the ESP32 WiFi troubleshooting guide.
External sources
- Espressif: ESP32 ADC documentation — channels, attenuation, calibration, noise, resolution, characterization.
- Espressif: hardware design guide — schematics, pins, power, signal, ground, antenna.
- Espressif: ESP32 datasheet — electrical characteristics, pins, memory, consumption, antenna, temperature.
- Espressif: ADC guide — channels, attenuation, calibration, noise, resolution, characterization.
- ESPHome: ADC sensor — configuration, attenuation, samples, calibration, offset, filters.
- Espressif: ADC guide — channels, attenuation, calibration, noise, resolution, characterization.
- Espressif: hardware design guide — schematics, pins, power, signal, ground, antenna.
- Wikipedia: photoresistor — principle, materials, spectral response, response time, applications.
- Wikipedia: voltage divider — formula, applications, load resistance, attenuation, noise.