Why people replace it
The routers an ISP installs are designed so the customer touches nothing. That means limited firmware, very little memory, mediocre coverage and very few network options. As soon as the home has many devices, or you need to solve something specific, the hardware runs out.
Replacing it gives you control over the firmware, QoS, VLANs, ports, connection logs and long-term stability. But it doesn’t always pay off: if your contract works fine and you don’t plan to change anything, the ISP router does its job.
Before you buy: four questions
- Does your ISP provide the PPPoE credentials or does it use IPoE? That’s the detail that decides everything else. It’s covered in PPPoE, VLAN and DHCP per ISP.
- Does your ISP router have an integrated ONT or is the ONT a separate box? That decides whether you can connect it to your own router directly. See ONT, HGU and neutral router.
- Did you subscribe to TV or landline phone? If so, those sections still need the ISP router, even if you browse with your own.
- Does your new router support VLAN on the WAN port? It’s essential for fibre, and many cheap home routers don’t. If it doesn’t, there’s no solution.
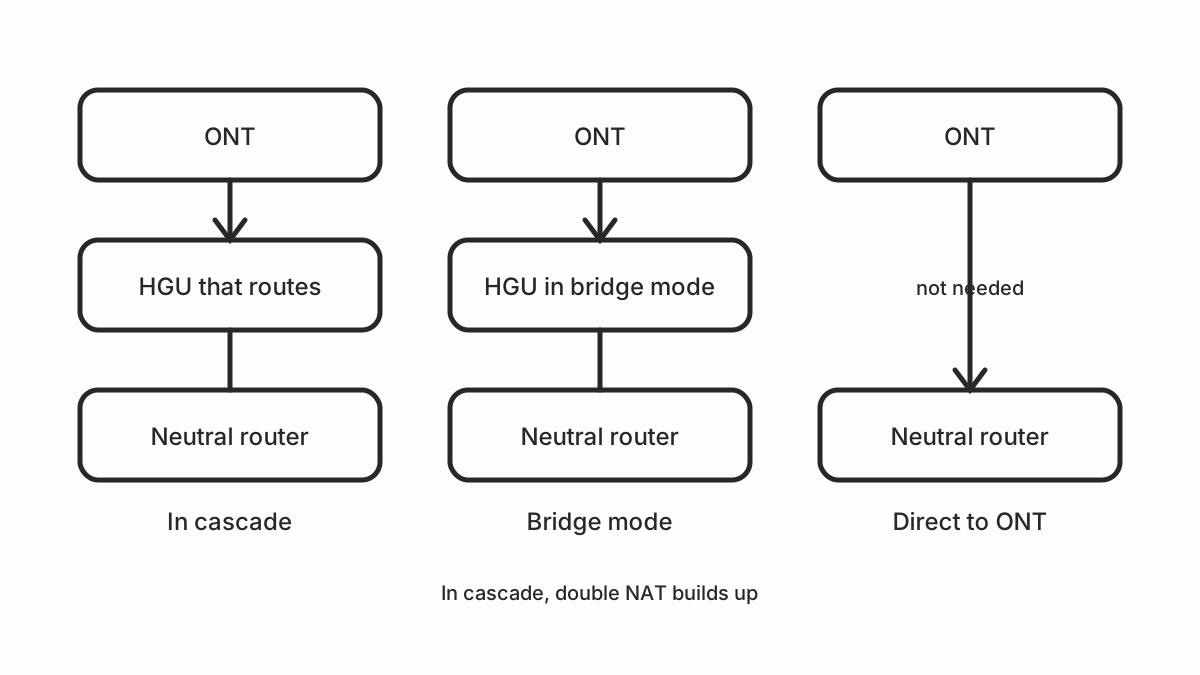
The three ways to connect it
| Topology | How it looks | Verdict |
|---|---|---|
| In cascade | ONT and ISP router, then yours | Bad: double NAT |
| Bridge mode | ISP router in bridge, then yours | Acceptable |
| Direct to the ONT | ONT and your router | The best |
1. In cascade
You connect the WAN port of your router to a LAN port of the ISP router. It’s the fastest option and requires no changes, but it creates double NAT: two routers translating addresses at the same time.
For browsing it’s not a problem. For everything else it is: opening ports means configuring forwarding twice, some games and servers don’t work, and clearing the DHCP leases on one router invalidates the other router’s IPs.
If it’s the only viable option, limit the damage by putting the ISP router in the DMZ pointing at your router; the cascade setup is described step by step in Bandaancha. That way all incoming connection attempts go straight to yours and you only have to map the ports once.
2. Bridge mode or ONT mode
You enable bridge mode on the ISP router, also called ONT mode or monopuesto. The router stops routing, stops handing out DHCP and stops broadcasting WiFi, and becomes a simple converter: it delivers the ISP signal through a LAN port.
The setup ends up like this: ONT and ISP router in bridge, and from there a cable runs to your neutral router.
Advantages: the public IP address is requested by your router, and port mapping is done in one place only. It’s the most common option when you want to replace the router without touching the fibre.
One important nuance: some devices, such as Movistar’s HGU Smart WiFi, do a pseudo-bridge that delivers the internet VLAN already untagged. In that case, in your own router you only configure PPPoE and don’t need to set the VLAN. If you set the VLAN and it’s also delivered untagged, it doesn’t work, and that’s a frequent cause of “it doesn’t work for me”.
3. Direct to the ONT
If you have a separate ONT, or if you manage to get the GPON key from the ISP device, you connect your router directly to the ONT. It’s the only option that leaves a single device doing the work and a single hop in the network.
Watch out here: Telefónica has announced restrictions on connecting ONTs that aren’t certified for its network. If a device isn’t certified, check with your ISP beforehand whether you can use it, because you could lose service. Connecting your router behind the ISP device is always the safest option in that respect.
Step by step
- Note down the IP address of your ISP router before changing anything, and take a photo of its current settings.
- Request the PPPoE credentials if your ISP provides them. The moment to ask is on the customer service phone call, not on the website.
- Look for bridge mode in the ISP router configuration. On some devices it isn’t listed and has to be enabled with an installer key.
- Connect the WAN of your new router to the LAN of the ISP router, which is still in bridge mode.
- Configure the VLAN and connection type you need in your router, following the table in the PPPoE and VLAN article.
- Check that you have a public IP address and browse.
- Move the devices to your router’s WiFi one at a time and without deleting the old settings until everything works.
- Once everything is stable, turn off the WiFi of the ISP router or unplug it, unless you need it for TV.
The mistakes that leave you without internet
- Setting the VLAN when the device already delivers it untagged. It’s the most common mistake with the Movistar HGU. If your session is PPPoE and the HGU is already in monopuesto, don’t set the VLAN.
- Losing TV. TV and landline phone stay on the ISP router, or they need their own VLAN. If you lose a single service, check that the ISP device is still powered.
- Confusing ONT with HGU. If your device has no integrated ONT, you can’t put it in bridge mode: you can only chain it.
- Forgetting the MTU. If everything works and then fails on certain sites, try MTU 1492 (PPPoE) or 1500 (IPoE).
- Resetting the ISP router to factory settings by accident. Then the ISP’s SSID comes back and you can’t tell which is which. Write down the credentials.
Quick checklist
- You know whether your ISP uses PPPoE or IPoE, and with which VLAN.
- You have the PPPoE credentials if they’re needed.
- Your router supports VLAN on the WAN.
- You know whether your device has an integrated ONT.
- You’ve noted down the ISP router’s original settings.
- TV and landline phone still work.
- You migrate the devices gradually, without deleting anything too early.
Sources and next step
To find out exactly which values your line uses, start with setting up your fiber router. If it works but you want to remove cables, continue with ONT, HGU and neutral router. And if you’d rather not complicate yourself with the configuration, a repeater or a mesh system may be enough.
External sources
- Bandaancha: neutral router in cascade or bridge mode — community source.
- OpenWrt: 802.1Q VLAN on the switch — for WAN and LAN tagging when the neutral router works in bridge mode.