A moisture percentage means nothing on its own
The most common mistake when buying a moisture sensor is looking at the price and the size. The most common mistake when using it is believing the percentage the app shows. That number isn’t universal: it’s an electrical reading that depends on the sensor, the soil, the pot, the temperature and even on how deep you pushed the probe. The right way to work is to compare readings at two known points: dry and saturated.
That said, choosing the type of sensor does matter, because it determines how long it lasts.
How the two types work
| Resistive | Capacitive | |
|---|---|---|
| Principle | Measures resistance between two electrodes | Measures capacitance change with the substrate |
| Electrodes touching the substrate | Yes | No, they’re insulated |
| Corrosion over time | Yes, quickly | Much less |
| Price | Very cheap | A bit more expensive |
| Sensitivity to salt | Very high | Lower |
| Stability in dry substrate | Noisy | Stable |
The difference in principle matters more than it seems: in a resistive sensor the electric current flows through the substrate, and whatever is dissolved in it — salts, what you irrigated with — becomes part of the measurement. In a capacitive sensor the electrodes don’t touch the substrate and the probe behaves like a capacitor whose value changes with water content. That’s why capacitive sensors hold up better in a real garden, where there are salts and not distilled water.
The problem with a resistive sensor: it eats itself
A metal electrode in permanent contact with damp soil and with electric current corrodes. Corrosion starts at the contact points, spreads and ends with the reading becoming useless or the probe breaking. Over a spring month, in a pot watered daily, it’s common.
That’s why resistive sensors are meant for short tests — stick a finger in, push in the probe, read the value and pull it out — and not for staying buried. If the project is serious, the coherent option is the capacitive probe.
The capacitive sensor: what you gain and what you lose
It wins on stability and durability. It also wins because salt affects it far less, which matters if you irrigate with hard water. In a datasheet such as the DFRobot SEN0193 you can see it’s sold as a capacitive probe with a watertight casing and cable, designed to stay in the substrate.
What you lose is sensitivity in very dry substrates: many of these sensors still register a high “moisture” value when the soil is completely dry, because the signal doesn’t reach zero. That’s why the threshold goes between the dry value and the wet value, not at a round percentage.
Where to place it: what affects the reading most
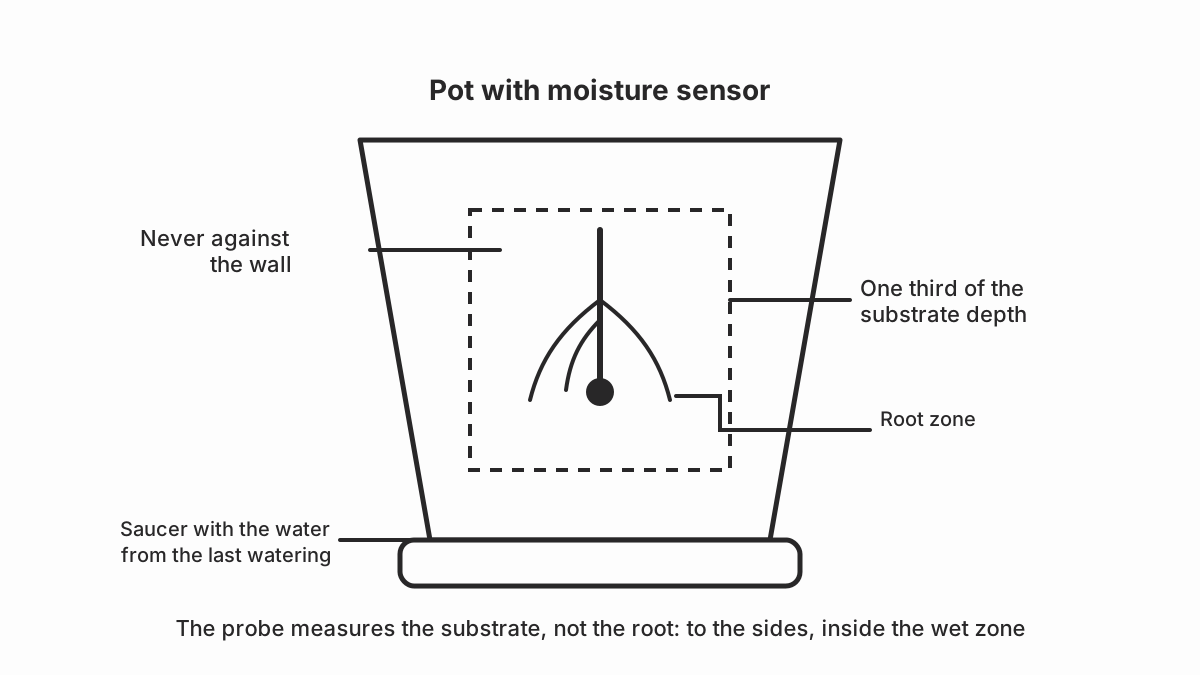
Four rules change the reading more than the sensor model:
- At a third of the substrate’s depth, which is where active roots concentrate.
- Not touching the pot wall. An electrode against the plastic reads the moisture of the pot, not of the soil.
- Not touching main roots. If the probe is pushed into the middle of the root ball, what you measure is the root and the value spikes.
- The same depth in every pot in the zone. If the probe is at five centimetres in one and twelve in another, you’re not comparing anything.
And one more, the most forgotten: if the zone has several pots, fit one probe per pot when the substrate or the size differ. A single probe for ten pots is only valid if the ten are practically identical.
Two-point calibration
The procedure is always the same and doesn’t depend on the model:
- Let the substrate dry naturally until you think the plant needs water. Write down the value.
- Water thoroughly and wait for the drainage. Write down the value.
- The decision threshold goes between those two numbers, not in the middle for the sake of symmetry.
- Check that the plant shows no signs of stress at either extreme.
With ESPHome you can turn that scale into a percentage with a linear calibration filter, which applies the two points you measured:
sensor:
  - platform: adc
    pin: GPIO34
    name: "Humedad cruda"
    update_interval: 60s
    filters:
      - calibrate_linear:
          slope: -0.15
          offset: 62
The slope and offset values are an example: yours come from the two points
you have just measured. The syntax is in the
ESPHome ADC component documentation.
Noise, temperature and maintenance
- Electrical noise. Keep the probe away from the pump, the relay and the power supply. A short cable helps.
- Temperature. A buried probe reads higher in summer. It’s not a fault: that’s why the threshold is reviewed with the change of season.
- Aeration. With a compacted pot, the reading drops even though there is water: the lack of air pushes the water aside. Substrate is fixed here where it’s fixed.
- Maintenance. Once a year, pull the probe out, clean the electrodes or the board and check that the cable has no cracks.
When the problem isn’t the sensor
If the plant dries out in a day and the sensor says there’s moisture, the problem may be the pot, the substrate or the root. If the reading is stuck, it’s probably that the cable has opened. If it jumps in big steps, it’s noise or a bad contact. Diagnosing automatic irrigation covers those cases from the other side.
Sources and next step
The datasheet for the DFRobot SEN0193 capacitive probe gives the operating range, the consumption and the wiring; the ESPHome ADC documentation explains the analogue reading and the calibration filters. For the software side that decides when to irrigate, the guide to automating irrigation with Home Assistant.
External sources
- DFRobot: SEN0193 capacitive soil moisture probe (PDF) — sensor datasheet, wiring and consumption.
- ESPHome: ADC component — analogue reading, attenuation and calibration filters.