Why separate the network
A normal home router puts the work laptop, the phone, the TV, the guests and twenty devices that only need internet on the same network. That coexistence is the problem: any compromised device may try to reach the others, and a guest has access to your home network.
Splitting into subnets isn’t paranoia: it’s the measure that reduces the attack surface the most in a real home automation installation.
The recommended structure
Three networks, with three levels of trust:
| Network | Who’s on it | Internet access | Smart home access |
|---|---|---|---|
| Main (trusted) | Laptops, phones | Yes | Yes, to what you choose |
| IoT (isolated) | ESP32, plugs, cameras | Yes | Yes |
| Guests | Visitors, third-party IoT | Yes | No |
| Isolated (no egress) | IP cameras, suspicious devices | only what’s needed | No |
The logic is simple: a low-trust device (a guest, a camera) needs internet, but it doesn’t need to see your laptop or your home server.
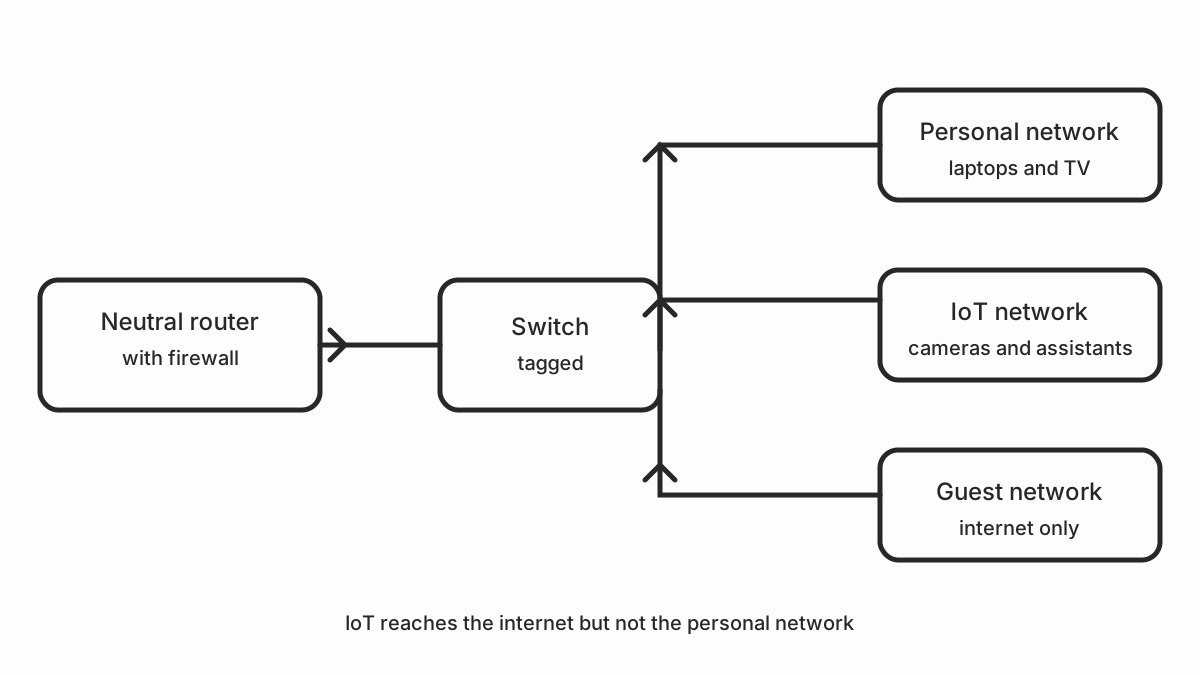
What you need
No new hardware if your router already supports VLAN, but most ISP routers don’t. The realistic path:
- A neutral router with OpenWrt as your gateway. The path is detailed in ONT, HGU or neutral router and in replacing your ISP router.
- A switch with VLAN support if you have more than one wired port, because the cable from the router to the switch has to be tagged (trunk).
- Access points to extend the network without cables, which is where the wireless side connects.
If you can’t cable, there’s a simpler alternative: a mesh system with support for a separate guest network. It isn’t as powerful as VLAN, but it covers the guest case.
Configuring the neutral router
The process in OpenWrt has four steps. The first three are network work, and the fourth is the rule that makes it work.
1. Create the interfaces
Define one interface per network, each with its own address range:
| Network | Interface | Example range |
|---|---|---|
| Main | lan | 192.168.1.0/24 |
| IoT | iot | 192.168.20.0/24 |
| Guests | guest | 192.168.30.0/24 |
The ranges can be whatever you want, as long as they don’t overlap. The separation works because each network has its own range and its own forwarding table.
2. The ports of each network
Assign the physical ports to the networks:
- Tagged ports (trunk): the ones going to the switch, so it can carry several networks over the same cable.
- Untagged ports (access): the ones going to an access point or a specific device, carrying only that network.
A properly configured access point can have a different SSID per network: the IoT network SSID and the guest SSID, both served over the same tagged cable.
3. DHCP per network
Each network needs a DHCP server that hands out addresses from its own range. In OpenWrt you configure one DHCP server per interface, as explained in the OpenWrt network documentation, and that way each device gets an IP consistent with its network.
4. The firewall between networks
This is the part that matters. OpenWrt organises filtering by zones, and a network with no zone assigned can’t talk to anyone: the reference is in OpenWrt firewall and zones. By default the firewall lets the IoT network go out anywhere, including your personal network. You have to change that.
The general rule is: from the IoT network only what the device needs is allowed, and inward nothing is allowed.
| Source | Destination | Allowed | Reason |
|---|---|---|---|
| IoT | Internet | Yes | Necessary |
| IoT | Smart home | only MQTT and DNS | The home server services |
| IoT | Main | No | Isolation |
| Guests | Internet | Yes | Necessary |
| Guests | Everything else | No | Isolation |
| Main | IoT | Yes | Management and updates |
| Main | Smart home | Yes | Access to the interface |
The practical result is that a compromised ESP32 can’t reach your laptop, and a guest can’t touch your devices.
Home Assistant and MQTT
The MQTT broker is configured in Home Assistant through its official MQTT integration; it’s best to set the user name and password the client will use there, not on the device.
If your home server publishes over MQTT, it’s a good idea to have the broker only listen on the smart home network, and to let the IoT devices connect to it without being able to reach anything else. That way, if a device ends up in someone else’s hands, all they have is access to MQTT, which is all it needs.
For complete network isolation, the guide is extend your WiFi coverage, and if the problem is disconnections, the starting point is IoT devices disconnecting from WiFi.
The right order of assembly
Don’t start with the VLANs. Build in this order, because each step verifies the previous one:
- Install the neutral router and check that everything works the same.
- Create the guest network, which is the easiest and already adds security.
- Add the IoT network with its range and its DHCP.
- Add the firewall rules.
- If you need more ports, add the tagged switch.
- Only then, if you have several floors, extend with access points.
Common mistakes
- Assuming DHCP already isolates. It doesn’t: without firewall rules, devices on one network can talk to devices on another.
- Tagging the trunk badly. If the cable to the switch isn’t tagged, the networks don’t get through and devices get the wrong IP.
- Blocking MQTT by mistake. If the firewall cuts the IoT network off from the broker, the sensors stop updating and it looks like a home automation failure.
- Making the IoT network the main one. If the IoT network is the trusted one, you haven’t isolated anything.
- Wanting to isolate the cameras and leaving them without internet. If they
don’t need internet access, the
denyrule is correct. If they do, “filtering by domain” isn’t enough: a basic firewall only filters by IP and port, so you have to authorise the destination IPs one by one or filter by DNS in the resolver.
Quick checklist
- Neutral router with VLAN, or mesh with the guest network separated.
- Tagged switch if there’s more than one cable.
- One interface per network, with its range and its DHCP.
- Firewall between networks: IoT doesn’t reach the personal network.
- Guests with internet and no access to anything else.
- MQTT reachable only from where it should be.
- Assembly in phases, starting with guests.
Sources and next step
Start with the technical basics in ONT, HGU or neutral router and setting up a fiber router with PPPoE and VLAN. If the problem is device disconnections, see IoT devices disconnecting from WiFi. And for exposure to the internet, remember the topic of CGNAT and ports.