Automatic irrigation is more than a controller
Most people who install their first automatic irrigation system buy the controller — the device with the screen and the buttons — and then discover that the problem was never there. A controller only opens and closes a valve on a schedule. Everything else, the water arriving at the right pressure, none of it being wasted, the shaded pot not flooding, and the installation surviving a winter, depends on decisions made before you buy anything.
The central idea of this guide is exactly that: automatic irrigation is a plumbing system with a schedule, not an electronic gadget. If the electronics are all you’ve bought, you have a controller that opens the valve while the water escapes through a badly tightened joint.
The three systems you’ll come across
| System | How it distributes the water | Best for | Main risk |
|---|---|---|---|
| Drip | Drop by drop next to the root | Pots, vegetable plots, hedges | Blockages from limescale or sediment |
| Sprinkler | Rain-like spray | Lawns and hedges | Wasted over a pot |
| Micro-sprinkler | Fine mist | Seedbeds and seedlings | Blocked by dust |
The difference isn’t cosmetic: drip delivers the water where the root looks for it, so it needs less flow and less evaporation. A sprinkler covers more surface per minute, but if you spray it over a pot you wet the substrate from the top and the water that doesn’t touch the root evaporates. Micro-sprinklers sit in the middle and are the option for seedbeds and seedlings.
If your space is made up of pots, always start with drip. The step-by-step installation is in drip irrigation: step-by-step installation.
The four parts of any installation
Whatever the system, a complete installation always has these four blocks:
- Water source. Tank, well or the mains supply. Mains water has pressure and carries sediment; well water, in many municipalities in Spain, is hard, and that’s precisely why the article on hard water and limescale in irrigation exists.
- Filtration and regulation. A filter in front of any solenoid valve, and a pressure regulator if the mains pressure is high. A clogged filter makes the flow drop and the irrigation look irregular even though nothing is broken.
- Distribution. The main line and the secondary lines running to each pot or each row. Microtubes are awkward to bend and break easily, but they reach where they’re needed without digging trenches.
- Control. The controller, the sensor, or both. This is where you decide whether irrigation runs on a schedule or responds to what’s happening in the substrate.
If one of the four is missing, you have a partial solution that will fail at the least convenient moment.
Why zones are the key decision
The most expensive conceptual mistake is treating the garden as a single zone. If all the pots are watered together for the same time, sun-loving plants get far too much water and shade plants rot. A zone is the set of plants that need the same water and the same schedule, and they’re watered separately.
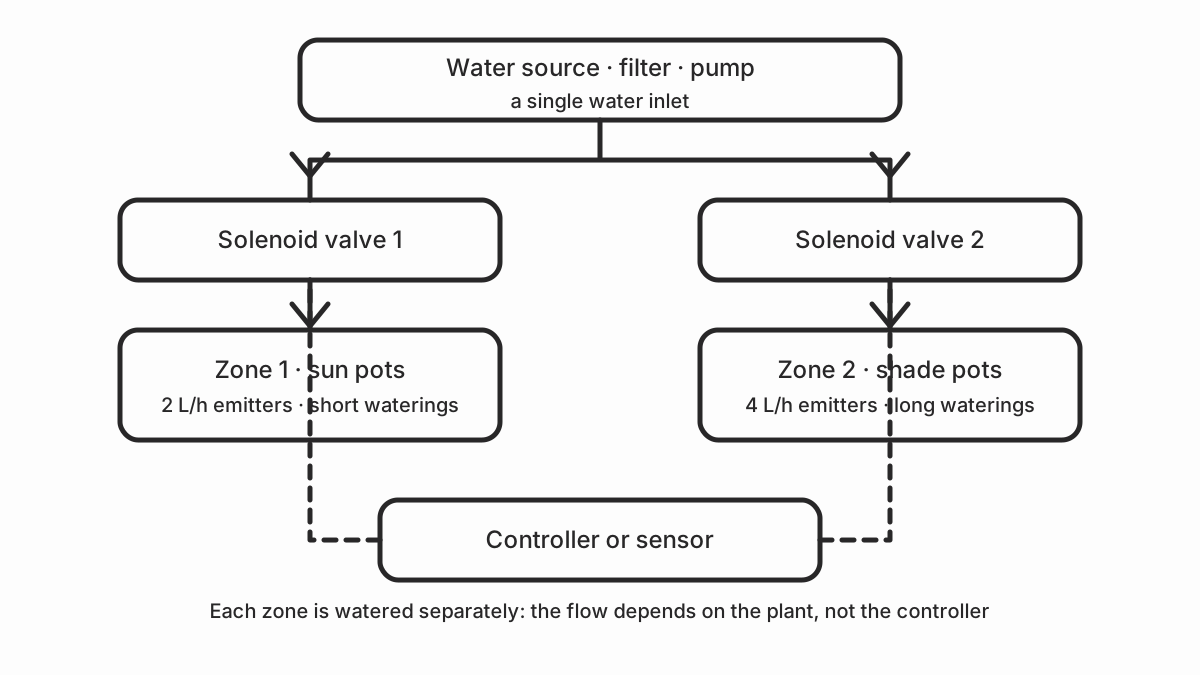
As a practical rule, each zone should group plants with similar needs: similar soil and exposure, and therefore a similar water demand. On a typical balcony with ten pots you rarely need more than two or three zones. In a large garden you divide by irrigation zone and by plant type.
The advantage of separating zones isn’t only saving water. When something fails, the damage is limited to one group of plants. If you split things up so the shaded pot doesn’t flood, you’ve already won.
Timer or sensor: which to choose
There are two ways of deciding when to water, and they aren’t mutually exclusive:
- By schedule. The controller waters at 7:00 every day. It’s simple, cheap and enough if the plant is stable. Its weak point is that it keeps watering when it has rained two days running or when there’s a heatwave.
- By reading. A moisture or rain sensor decides whether watering is needed. It’s finer, but it needs calibration and maintenance.
The most common mistake is installing a sensor-based system on a plant whose demand changes every week. If you’re not clear how much a plant consumes, start with a schedule and add the sensor after a season of watching the data. The comparison between capacitive and resistive soil sensors will help you decide what the sensor you’re interested in actually measures.
A third approach is to consult the weather: if you feed rainfall data for your area into the decision, you avoid watering after a storm. The DIY weather station covers that part.
How much water and for how long
The most ignored piece of information: the amount of water a plant needs depends on the climate, the substrate and the size of the pot, not only on the plant. A pot with 30 litres of moist substrate holds far more water than a 5-litre pot that has just been watered, and a dry windy day evaporates water several times faster than a cloudy one.
To size it without inventing figures, the method is to measure: weigh the dry pot, water it thoroughly and weigh it again. The difference is the water you gave it; afterwards you can check how long it takes for that weight to drop. That figure, together with the water demand by plant type, is more useful than any generic table on the internet.
Recommended installation order
- Decide the zones before buying anything.
- Lay out the circuit dry, on the ground, and check that the water reaches every point.
- Fit the filter and the regulator before the first solenoid valve.
- Flush the lines until clean water comes out. Don’t do this with the planting already in place.
- Measure the real flow of an emitter with a cup and a stopwatch. If it doesn’t match expectations, the problem is pressure, not the emitter.
- Schedule few waterings and short ones first; increase afterwards.
- Install the sensor, if you’re going to use one, and watch the readings for two weeks before trusting it.
This order avoids most of the repeated work, because rerouting the pipework is the expensive part.
The mistakes that ruin an automatic irrigation system
- A single zone for the whole garden. It’s the most common mistake and the hardest to fix later.
- No filter. Solenoid valves and emitters are blocked within weeks.
- No backflow preventer. Water from the pot can be sucked back into the mains.
- No drain point at the lowest point. When the cold arrives, trapped water freezes and splits the line.
- Scheduling more than the available flow. If the controller opens two solenoid valves at once and the pump can’t deliver, no zone gets watered properly.
- Trusting an uncalibrated sensor. An invented threshold either waters too much or waters far too little.
- Doing no maintenance. Filter, emitters and valves get checked twice a year, not never.
If you already have something installed and it doesn’t water, the probability-ordered diagnosis is in automatic irrigation not working: causes and solution.
Maintenance: two visits a year
Before the dry season, clean the filter, check that the emitters discharge water, adjust the pressure regulator and verify that the valves open and close. In autumn, flush the lines if they’re going to stay installed through winter, and disconnect the pump if it can freeze.
If the installation runs on 230 V, all of this is done with the power disconnected, and the design must comply with the electrical regulations. And if you’re also going to build the electronics side, the ESPHome irrigation project covers the control side.
Sources and next step
To size the system, use FAO-56, which explains how to calculate the water demand of a crop. For the installation, Rain Bird’s sprinkler system installation guide documents the pressure, flow and zoning criteria that apply to any system.
External sources
- Rain Bird: sprinkler system installation guide (PDF) — pressure, flow per zone and installation components.
- FAO: Crop evapotranspiration, Paper 56 — how to estimate a crop’s water demand from the climate.
- AEMET OpenData — rainfall and temperature data to decide whether today’s watering is needed.